I'm going to give you the latest settings and also Droid VPN config files for easy connection.
The settings I'm going to share with you in this article are super fast.
They work so great on netone as well as other networks in different countries.
You can try them on your mobile network and let me know how are they performing.
Also if these settings are not properly working for you you can drop a comment.
I can help you to make these settings effective on your mobile network.
They are working perfectly and they are super fast, they will remain like that.
If you're having challenges configuring the settings below please drop a comment.
These latest Droid VPN settings for netone are easy to configure and there's a guide below.
Droid Settings For Netone
Droid settings for netone Zimbabwe, please follow the configuration guide below.
First of all, make sure you have a working and activated Droid VPN account.
If you don't have a droid VPN account you can check how to activate Droid VPN account.
Droid Settings
First of all, create an account and click on the three lines on the upper left corner of the app.
Now click on account and enter your username and account details then click Save.
Now you need to go to the application settings and click on the settings tab.
Head on to TCP and HTTP then on remote TCP port enter 443.
On the local Port enter 1080 and click send HTTP headers on TCP to turn it on.
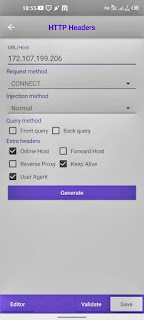
Once done, click on set HTTP Headers.
Now you need to set HTTP Headers as follows, URL/Host: 172.107.199.206.
On extra headers tick online host, user agent and keep alive and leave the rest unchecked.
After that, you're all done, now you need to click the buttons generate, validate and save.
VPN Connection Settings
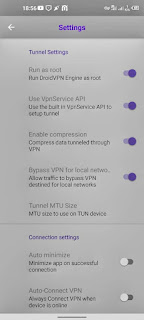
On VPN connection settings you just need to turn on the first 4 options only.
Leave the rest settings turned off and go back to the main user interface.
After that go back and choose the server you want, you should start with a free server.
After that click on the start button and begin connecting, this doesn't require 1 or 2 clicks.
Depending on your network it may take too longer to connect.
But if you have failed to get a connection after continuously clicking the start button for 20 minutes proceed below.
Proxy Settings
If you are feeling to connect on TCP or HTTP you may need to enable your proxy settings.
This will make the connection easier and faster.
Click on enable proxy and on proxy host enter one of the following hosts:
104.149.148.242
104.149.148.244
104.149.148.246
104.149.128.242
104.149.135.99
104.149.135.100
Pick any of the above host addresses and enter them in the proxy host field.
Click save and proceed to proxy port and use 8080.
Now go to proxy HTTP headers and on URL or host enter 172.107.199.206
On extra headers tick keep alive only.
Connection Trick
After that, you now need to connect your Droid VPN normally by clicking the start button continuously.
This usually takes from 2 to 15 minutes to click the start button without waiting.
However, if the connection is still failing you can try this connection trick.
Click on the start button and when it says connecting https... Click on the Stop button.
Repeat the process until it started saying could not open main TCP socket.
Continue clicking and if it fails in 5 minutes then force stop the app and clear cache.
Come back in 5 minutes and you should connect in only one click.
Create Droid VPN Account
If you don't have a Droid VPN account there is no way you are going to connect to Droid VPN.
So this means you need an account to use Droid VPN.
If you sign up you will be issued a free account that you will be able to upgrade if you want.
To create a Droid VPN account you need to click here and follow the steps below.
Enter a username, email and password to proceed.
Your username must be unique, so be sure to enter a username that has not been used before.
Enter an email address that you have access to and a memorable password, password strength doesn't matter.
Complete the I'm not a robot captcha challenge and click sign up button.
How To Activate Droid VPN Account
After you have successfully signed up for your Droid VPN account you then need to activate it.
To activate your Droid VPN account you need to confirm your email address.
To confirm your email address you need to click a link that you will receive after signing up.
That link will be sent to an email that you registered while signing up for your Droid VPN account.
If you entered the wrong email you need to sign up again with a correct email that you can access.
Once done, open your email inbox and you will find an email from Droid VPN.
Open that email and you will find a link and a button that says confirm your email.
And also that email will contain your login username and password.
Click either the button or the link and your email will be automatically verified.
This is it now you will be able to use your Droid VPN account, it is now active.

